Similar to video lighting, you don’t have to make a huge investment in sound equipment to start out in video production. There are free and low-cost options available to use until you are sure you want to pursue video more actively. You will quickly discover, however, that the more you invest in sound equipment, the better your sound quality is.
Free Sound Option
Any camera capable of shooting video also has the capability to record sound. This includes pro video cameras, camcorders, DSLRs, point-and-shoot cameras, and even cell phones. Typically, professional-quality video cameras have high-quality shotgun microphones attached to them. Definitely, a great way to go for remote interviews and documentary video work, but in a controlled environment, most videographers would use a higher quality sound recording device.
With all the other camera types, the built-in microphones are not what I would call high quality. They get the job done, but just barely. You will often hear background noise, an echo sound, and even a tinny quality to the sound.
Since I do all of my video work with a DSLR, I’ll address that particular microphone. With the Nikon D7000, the microphone is just under the model number on the front of the camera. It’s a mono microphone located behind three holes in the plastic. It gives you a fairly low-quality sound with a dash of room echo. Also, if you use the camera’s autofocus feature, you will pick up the noise of the focus motor.
Better Sound Option For DSLR Cameras
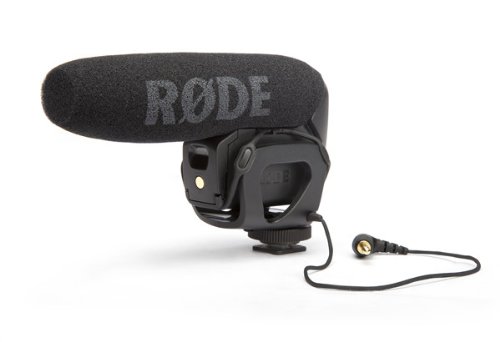
A very popular alternative to the DSLR’s built-in microphone, and one that I use, is the Rode VideoMic Pro. This is a directional shotgun-style microphone that mounts onto your camera’s hotshoe and plugs into your external microphone jack. The microphone itself is suspended by rubber shock bands which isolate it from the noise of the camera body. The VideoMic Pro can be used as a primary microphone or as a reference microphone, which I cover in more detail below.
Although a definite step-up from the DSLR’s internal microphone, the VideoMic Pro is not perfect. You will notice a huge improvement in sound quality, especially outdoors. Indoors, however, you will still pick up just a bit of echo. This is caused by the distance between the microphone and the talent. You can eliminate echo almost entirely by mounting the VideoMic Pro on a pole and positioning it just above the talent, but this requires an extension cord for the microphone or the use of a sound recorder.

Best Sound Option For DSLR Cameras
For talking head or interview videos, one of the best options is to use a lavalier microphone. A lavalier is a very small microphone clipped to the cloths approximately six inches from the mouth of the talent. If you’ve ever watched a newscaster, you’ve seen a lavalier. When well placed, however, you hardly notice them. Here’s a good video by Izzy Hyman of IzzyVideo on 7 Ways To Hide a Lavalier that you may find useful.
Lavaliers are typically good-quality microphones. What makes them really effective, however, is that they are placed very close to the mouth of the talent. This eliminates a lot of the ambient noise levels and room echo.
Lavalier microphones vary in cost anywhere from $20 to hundreds of dollars. As is usual with most video production and camera gear, the higher the cost, the higher the quality, and the more features. I have found one lavalier microphone however, that is not only high quality at an extremely affordable price, but is also made in the United States. Giant Squid Audio Lab makes and sells a few lavaliers that I highly recommend. They have a nice look and they work great. Currently, their Omnidirectional Mono Microphone only costs $40.
Sound Recording Options
If you do decide to go the route of an external microphone, you will have a couple of options in how you will record the sound. The first is to plug directly into your DSLR’s external mic port. This is a 3.5mm minijack connector located somewhere on the camera. On most Nikon DSLRs, it’s on the left side behind a rubber access door. If you plug directly into your camera’s external mic port, you will need a microphone cord long enough or an extension cord.
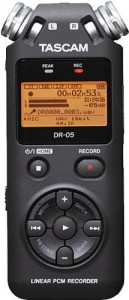
Option two is to plug your microphone into a sound recorder. There are many of these on the market ranging in price from less than $100 up to several hundred dollars. Two popular brands used by photographers and videographers are Tascam and Zoom sound recorders. You will have to shop and compare to determine which is best for you. The Tascam DR-05 and the Zoom H1 are two of the very popular, low-cost options for entry-level video production. I’ve been using Tascam for years, and have always been happy with them.
XLR Connector vs 3.5mm Minijack Connector
One thing to be aware of when purchasing a microphone or a sound recorder is there are two common connectors used on microphones. Higher-end microphones and sound recorders typically use what is known as an XLR connector. A rather large connector with three pins.
The other connector commonly found on the lower-cost options is the 3.5mm minijack. This is the same connector found on most headphones and earbuds. It is also the connector you will need if you are plugging a microphone into a DSLR camera.
The important thing here is to make sure that your microphone if capable of plugging into whatever sound recording device you elect to use.
Primary Microphone vs Reference Microphone
When shooting, many videographers and cinematographers actually record two separate tracks of audio. The primary microphone is either a lavalier or shotgun microphone placed close to the talent’s mouth and plugged into a sound recorder. A second microphone is used solely as a reference and is typically the camera’s internal mic or an external mic plugged into the camera.
In this situation, the reference soundtrack is recorded with the video using a lower-quality microphone. Later in editing, the higher quality audio track from the sound recorder is synchronized to the reference track either manually or with software like PluralEyes by Red Giant. After the two tracks are synchronized, the low-quality reference track is muted. Using both a primary and a reference audio track is a very simple way of syncing high-quality sound to your video.
Wind Screens
Windscreens are usually foam or artificial fur covers that are placed over the microphone to cut down on wind noise. You will often hear the artificial fur cover referred to as a dead cat.
If you have any kind of wind outside, it is best to put a windscreen on your microphone regardless of whether it’s a shotgun-style mic or a lavalier. My Rode VideoMic Pro has a foam windscreen as standard, and I have a fur windscreen (dead cat) that fits over the foam in extremely windy conditions. My Giant Squid lavalier has a small foam windscreen, but I only use that when I have to.
You will oftentimes hear the foam windscreen referred to as a pop filter, although technically, it is not a pop filter. A pop filter is used in a studio environment and prevents sudden rushes of air from hitting the microphone when saying words starting with “P” or “S”. It also prevents corrosive saliva from getting on the microphone. However, with that said, a foam windscreen can do a decent job of acting as a pop filter for those microphones placed close to the mouth.
One of the best resources for fur and foam windscreens is The WindCutter. There you can find very high-quality products for a wide range of microphones.
Is that all there is to know about sound capture and recording?
I wish that was all there is to know. This has been an introduction to video sound recording. I’m positive I’ve only scratched the surface, and there is a lot more to learn.
Just like in the previous article on lighting, no matter what you currently have for sound capture and recording, give video production a try. You can improve your skills and add to your equipment later. And don’t forget to share a link to any of your video experiments below.