With the advent of the modern digital camera, keeping the camera steady in low light and with larger focal length lenses is not the problem it was back in the days of film. It’s easy to set the ISO higher or turn on Auto ISO to get higher shutter speeds. But there’s a tradeoff when using a higher ISO in that you are sacrificing image quality and picking up noise in order to keep the image sharp.
Rather than using technology to compensate for those longer exposures, that longer focal length lens, or just bad camera handling, why not adopt some tried and true handholding techniques to steady your camera? Of course, the best method would be to use a tripod or monopod. But sometimes using a tripod isn’t an option. And if you’re like me, tripods just slow you down. I tend to shoot using a photojournalistic approach, meaning I shoot fast and always on the move.
Here are a few of the techniques I’ve used over the years to steady my handheld camera.
1. With camera in hand, you should have a good solid grip, but not tense. If your knuckles are turning white, you’re holding your camera too tight. Relax a little.
2. Typically, your right hand will hold the camera’s grip while controlling the many dials and buttons including the shutter release. The left hand will support the weight of the camera and the fingers will control the focus and zoom rings on the lens if needed.
3. You’re going to use your entire body as firm support and acting as a tripod. With the camera to your eye, your elbows should be tucked in tight against your body acting as two legs of the tripod. Your face will act as the third tripod leg. No chicken wings with your elbows pointing outward. If your elbows are out, not only are you going to have shaky camera work, but you will tire fast which will just compound the problem.
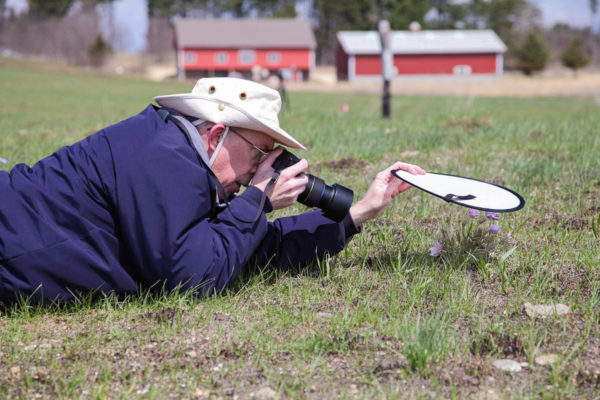
4. If available, brace yourself against something solid like a tree, wall, pole, or doorway. If nothing is available and it won’t have a negative impact on your composition, then try sitting down, squatting, or kneeling and resting your elbows on your legs. Lying down on the ground with your arms and camera out in front of you also works well.
5. Try placing your camera on a solid surface like a rock, fence post, or roof of a car. All the camera stores sell bean bags and a multitude of gadgets that cushion your camera when placing it on a solid surface. They work to protect your camera finish and also will put more of the camera in contact with the solid surface. I don’t use any of these products but can see the benefit in using them.
6. Hold your breath while shooting. No…not until you turn blue and pass out. Prior to taking any photo, take a deep breath, let it partially out, hold your breath and then release the shutter. I’m talking about a second or two tops. At first, you will have to consciously remind yourself to do this. After a while, it becomes second nature. I’ve been shooting for 35 years now, and holding my breath just happens. I know I do it, but am not aware of it.
So, next time you’re out shooting, give some of these techniques a try if you’re not already using them. They will help you steady your camera in any and all situations. Even if you are shooting at a fast enough shutter speed where blur won’t be an issue, these techniques will make you look more professional and you will feel in control.
Using these techniques and practicing will also let you eventually break one of the rules of photography. You’ve probably heard the old adage that when handheld, your camera’s shutter speed should never drop below the reciprocal of your lens focal length. Meaning that if you are using a 135mm lens, your shutter speed should be no lower than 1/135th of a second (or something close like 1/125th). Using some good handholding techniques and breath control may allow you to drop down to 1/60th of a second. For some of you…maybe even lower than that. Practicing and experimentation are the only things that will give you those answers.
Thank you Kyle. I’m glad you enjoyed the article. Hey…I’m always looking for subjects to write about. Please stay in touch and let me know what you’d like to read about. I’ll see what I can do.
excellent info