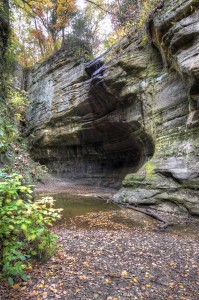
In the previous HDR article, I discussed how I captured my first High Dynamic Range (HDR) images while visiting Starved Rock State Park in central Illinois. If you haven’t read that article yet, here’s a link to it – Introduction to HDR Photography: Capturing the Image.
In this article, I will go through the workflow I used in processing those images. Although not overly difficult, like everything in photography, it takes a little knowledge, a little experience, and eventually, you will develop a little talent in processing HDR images.
As mentioned in the previous article, I got my knowledge in the way of Trey Ratcliff’s Complete HDR course (Mac / Windows). A series of 20 videos covering every aspect of HDR photography along with 75 images to practice with. Initially, I did all of my post-processing training using the images supplied with the course. But like most things in life, eventually, I had to take the training wheels off.
My HDR Software
The HDR processing software that I use is Photomatix Pro by HDRsoft. I’m sure there are other free and paid software programs out there for processing HDR, but everyone I know and read recommends Photomatix Pro. Rather than choosing and learning some photography software on my own, I prefer to stick with a software package where I can get lots of training from people who I know and trust.
Another reason I chose Photomatix Pro is that you can download a full copy of the program totally free and use it for as long as you want. Of course, there is a catch. The free version puts a watermark on your image during the export stage. But if you are just learning HDR photography, then use the free version. If you discover that you like HDR, you can buy a full license later for $99.
HDR Workflow
As you remember from the previous article, I made three images of the same scene, each made with a different exposure. One normally exposed, one underexposed by 2 Exposure Values (EVs), and one overexposed by 2 EVs. Below is a list of how I processed those.
It may seem somewhat excessive in that it takes four separate programs, but this is just the way I do it. It’s possible to process an HDR image with just Photomatix Pro. I use Adobe’s Lightroom, Bridge, and Photoshop to aid in file handling and to improve the overall quality of the final product.
Steps I used in processing an HDR image:
- Export from Adobe Lightroom into Photomatix Pro – I start out with Lightroom only because that is the program I use for cataloging and processing all images. It’s simple to get the images into Photomatix using a free Photomatix plugin for Lightroom.
- Process the images using Photomatix Pro – Photomatix Pro is fairly simple to use. It comes with some built-in presets, and you can use presets from other photographers. Trey Ratcliff has his own set of presets he sales. I will go into more depth on processing the HDR image in the next article.
- Save the processed HDR image – Once done, I export the finished image to a folder labeled “HDR PHOTOS FOR PROCESSING” so that I can easily find it later. As an alternative, the finished HDR image can be automatically exported back into Lightroom, and this is something I will experiment with at a later time.
- Process a second image normally using Adobe Lightroom – You don’t have to do this step. I learned it from Trey Ratcliff. He recommends using a second image processed normally using Lightroom and then blending this image with the HDR image in Photoshop to cut down on the unrealistic, cartoon look.
- Save the second image to the same folder as the first – I export the Lightroom version of the image to the “HDR PHOTOS FOR PROCESSING” folder.
- Import both versions of image into Photoshop – Using Adobe Bridge, I went into the ‘HDR PHOTOS FOR PROCESSING” folder, selected by HDR version and Lightroom version of the image, and then loaded both into Photoshop as layers from the TOOLS menu.
- Blend both images together using layer masks – By using layer masking techniques in Photoshop, I was able to blend the normally processing image into the HDR image to help improve the overall quality of the image. Primarily find that using a 50-80% mask in highlight areas helps to tone down the unrealistic look.
- Save the finished image – From Photoshop, I flattened my image layers and then saved the image as a JPEG to a folder I labeled “HDR PHOTOS COMPLETE”.
As I mentioned earlier, this is the workflow that I use, because it is what I learned and am comfortable with. You do not have to use Adobe’s Lightroom, Bridge, or Photoshop to do HDR work.
Simple HDR processing:
- Import images directly into Photomatix Pro
- Process the images using Photomatix Pro
- Save the finished HDR image.
If you have any questions about HDR photography or any HDR tips that you would like to share, please leave a comment below.